Blurry photos can be frustrating in a very specific way.
You take what feels like the perfect shot — the composition is right, the lighting looks good — but when you check the image, it’s soft. Slightly smeared. Not sharp enough to use.
Most people assume it’s a camera problem. It’s not.
In reality, this issue is almost always caused by camera shake — small, often invisible movements that happen while the camera is capturing the image.
The good news is that this is completely fixable.
Quick Answer : The best way to fix shaky hands photography is to increase your shutter speed (at least 2–3× your focal length), stabilize your body by keeping elbows tucked in, and use burst mode to capture sharper frames. Combining proper technique, camera settings, and support tools like a monopod or tripod reduces camera shake instantly.
Whether you’re shooting on a phone, a DSLR, or dealing with naturally unsteady hands, this guide will show you how to fix shaky hands photography using a system that actually works in real-world situations.
What Is Camera Shake and Why It Happens
Camera shake occurs when the camera moves while the shutter is open.
Even tiny movements can create blur across the entire image.
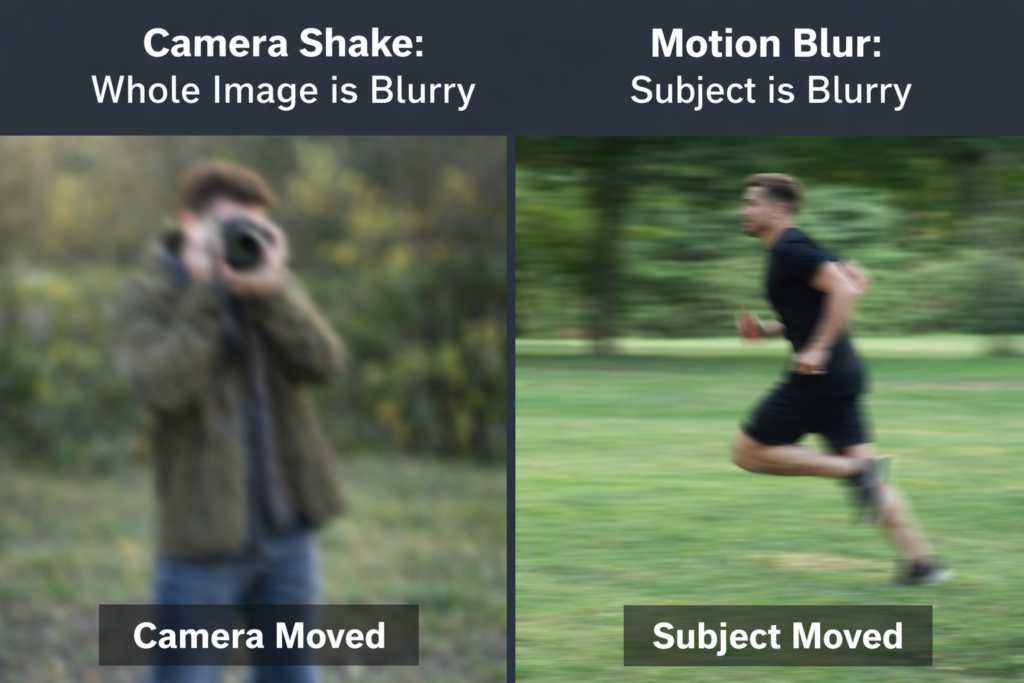
Camera Shake vs Motion Blur
- Camera shake → whole image is blurry
- Motion blur → subject is blurry
Understanding this difference is crucial because the fix is different.
Why Your Hands Shake When Taking Pictures
If you’ve ever asked:
- “How to stop shaking when taking pictures?”
- “Why do my hands shake when taking pictures?”
Here’s what’s really happening:
Common Causes
- Low light → slower shutter speed
- Zoom lenses → magnify movement
- Poor grip → unstable posture
- Breathing & tension
- Fatigue or caffeine
- Natural tremors (including essential tremor photography cases)
Most people don’t have “bad hands”
They have bad conditions + technique
The Core Framework: How to Reduce Camera Shake
To fix blur, you must address two things:
1. Shutter Speed Control
Faster shutter = less time for movement
2. Stability Control
Less movement = sharper image
The Shutter Speed Rule (And Why 1/60 Fails)
The Reciprocal Rule:
Minimum shutter speed = 1 / focal length
Examples:
- 50mm → 1/50s
- 200mm → 1/200s
Real-World Upgrade:
Use 2x or 3x faster
So:
- 50mm → 1/100 or 1/150
- 200mm → 1/400+
This is the difference between:
“Consistently sharp”
“Sometimes sharp”
In my experience, most blurry photos come from using shutter speeds that feel fast but aren’t actually fast enough for the lens being used. Once I started doubling my shutter speed instead of following the basic rule, the difference in sharpness was immediate. It’s one of those small changes that completely transforms your results.
How to Stop Shaking When Taking Pictures (Beginner Fixes That Work Instantly)
If you’re wondering “how to stop shaky pictures?”, start here:
Step 1: Fix Your Grip
Hold the camera with both hands. Support the lens from underneath and keep your grip firm but relaxed.
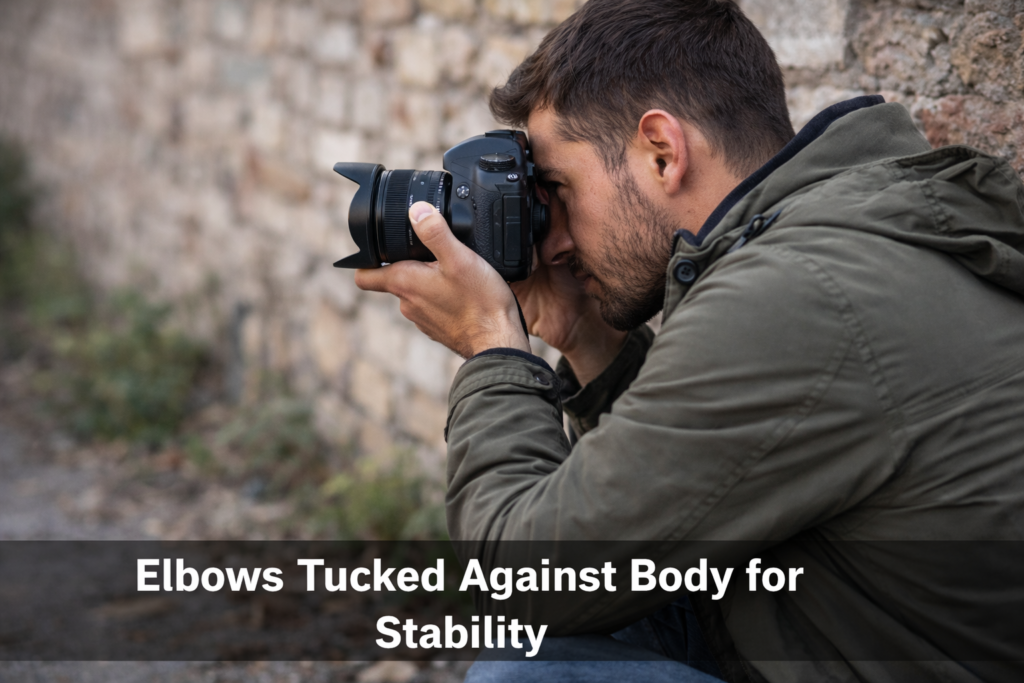
Step 2: Stabilize Your Body
Pull your elbows into your ribs and bring the camera close to your chest or face. Your body becomes a natural stabilizer.
Step 3: Control Your Breathing
Exhale slowly and press the shutter gently. Avoid sudden movement.
Step 4: Increase Shutter Speed
Always prioritize shutter speed over everything else.
Step 5: Use Burst Mode
Take 3–5 shots quickly — the middle frame is often the sharpest.
This system alone solves most shaky camera issues.
How to Reduce Camera Shake and Blur in Photos (Advanced Settings)
Increase ISO (Smartly)
Increasing ISO allows faster shutter speeds, which directly reduces blur. While ISO introduces noise, it is always better than losing sharpness.
Use Wider Aperture
A wider aperture also allows more light into the camera, helping maintain faster shutter speeds.
Turn On Stabilization
Modern cameras include camera shake reduction features such as IBIS and lens stabilization. These technologies compensate for small movements and improve handheld shooting.
How to Avoid Camera Shake Without a Tripod
You don’t always need a tripod.
You can use your surroundings to stabilize your shot. Leaning against a wall, resting your elbows on a surface, or sitting down and using your knee as support all reduce movement.
The strap tension method is another powerful technique. By pulling the camera forward until the strap is tight, you create stability through tension.
Monopod vs Tripod
A tripod provides maximum stability but limits mobility.
A monopod offers a balance — it reduces shake while allowing movement, making it ideal for sports and events.
| Feature | Monopod | Tripod |
|---|---|---|
| Setup speed | Fast setup | Slower setup |
| Stability | Moderate stability | Maximum stability |
| Shake reduction | Reduces vertical shake | Eliminates most shake |
| Mobility | Very portable, easy to move | Bulky, less mobile |
| Best for | Events, sports, run-and-gun shooting | Night photography, landscapes, long exposure |
| Space needed | Minimal (great for crowds) | Requires more space |
| Weight | Lightweight | Heavier |
| Flexibility | Easy to reposition quickly | Fixed position once set |
| Long exposure | Not ideal | Excellent |
| Ease of use | Simple, quick | More adjustments needed |
How to Reduce Camera Shake When Filming
Video introduces a different problem — the camera shaking effect.
Instead of eliminating movement, you need to control it.
Smooth motion hides shake, while static shots expose it. Shooting at higher frame rates like 60fps also helps create smoother footage.
Reduce camera shake iPhone
To reduce camera shake iPhone:
- Use both hands
- Avoid zoom
- Enable stabilization
- Improve lighting
Important Insight : Smartphones reduce shutter speed in low light, which increases blur.
How to Avoid Camera Shake Nikon
Turn ON VR (vibration reduction)
Use viewfinder (extra stability)
Don’t change settings mid-shot
Pre-set everything
Same principles apply across all cameras
Advanced Techniques Most People Don’t Know
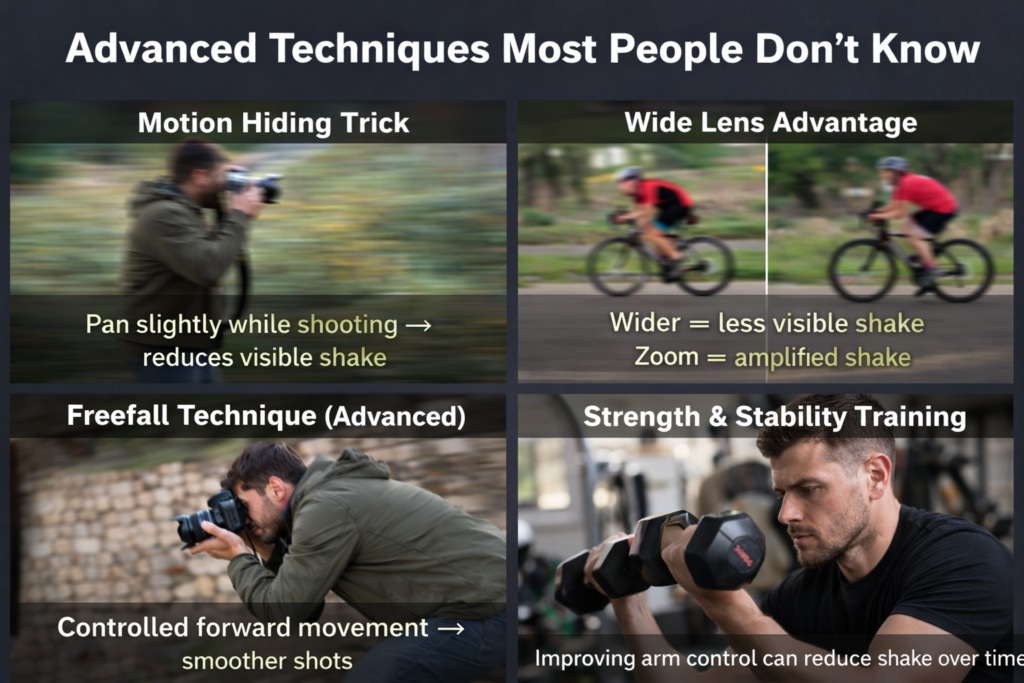
Motion Hiding Trick
Pan slightly while shooting → reduces visible shake
Wide Lens Advantage
Wider = less visible shake
Zoom = amplified shake
Freefall Technique (Advanced)
Controlled forward movement → smoother shots
Strength & Stability Training
Improving arm control can reduce shake over time
Essential Tremor Photography
Can you be a photographer with shaky hands?
Yes.
With proper techniques, even those dealing with essential tremor photography can capture sharp images.
Essential Tremor Photography Techniques
- Use support
- Use faster shutter speeds
- Use stabilization tools
- Shoot in bursts
It’s not about eliminating shake. It’s about managing it
Reddit Insights: What Actually Works
From real discussions like how to fix shaky hands photography reddit:
- Use burst mode
- Prioritize shutter speed
- Stabilize body
Real-world advice confirms the fundamentals.
What Does NOT Work (Avoid These Mistakes)
❌ Increasing megapixels
❌ Relying only on AI tools
❌ Shooting slow shutter handheld
❌ Using zoom unnecessarily
❌ Ignoring technique
No tool can fully fix motion blur after capture
Troubleshooting Guide
| Situation | What to Do |
|---|---|
| Blurry in daylight | Increase shutter speed |
| Blurry at night | Add support (tripod/monopod) |
| Blurry when zoomed | Reduce focal length or increase shutter speed |
| Shaky hands | Use burst mode + stabilization |
| Filming video | Add motion or use stabilization |
FAQ
How to stop shaky pictures?
Use faster shutter speed, stabilize your body, and use burst mode.
How to reduce camera shake and blur in photos?
Increase shutter speed, raise ISO, and improve stability.
Can you be a photographer with shaky hands?
Yes, with proper techniques and tools.